Update custom fields for meters with a spreadsheet
Last updated June 24, 2026
What it is for
Use this spreadsheet to:
- Update meter custom field values.
- Remove existing custom field values.
- View existing custom field values.
How it works
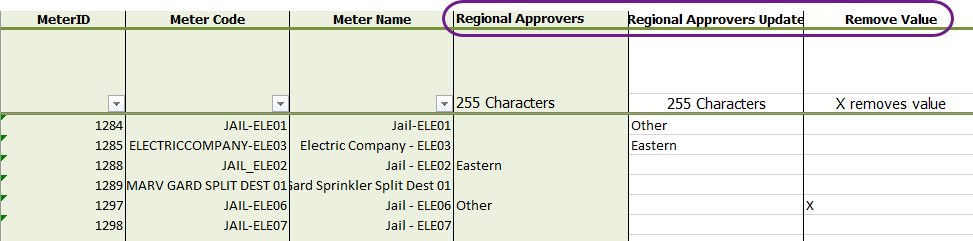
Each custom field you have created is a separate column header.
- Green columns
Show existing values (do not edit). - White columns
Enter the new value you want to apply. - Remove value
Place anxin the column labeled Remove value to clear the current value in the application. - Download a fresh copy to ensure that you're using the latest version and data.
You can only do one action per row: either update or remove, not both.
What you can't do
- ❌ You can't delete custom fields with a spreadsheet.
You must use the application to delete custom fields. Use the Sites and Meters module menu and select Custom Fields for Meters.
Update spreadsheets save time and allow you to update multiple items at once.
- Update spreadsheets typically display two columns for each attribute, updates should be entered in the white columns.
- Always download a new spreadsheet before you begin adding information because each sheet is populated with data from the database.
Formatting rules
- All information should be entered as text or dates.
- You can add sheets if needed, UtilityManagement only processes the sheet named DataEntry.
- Do not remove columns.
Download the update spreadsheet
In the Create dialog, select Setup Spreadsheets.
- From the Setup Spreadsheets Log, click Download.
- Under Update Spreadsheets, select Custom Fields: Meters.
- Set the filters as needed to limit the amount of data in the spreadsheet.
- Download the spreadsheet.
- The file name format is
yyyymmdd-UPDATE_CustomFieldsMeters.xlsx. - Add your information and save.
- Use Import to upload your spreadsheet.
- The Setup Spreadsheets Log reports the results and any errors. You can download the error (kickout) spreadsheet from the hyperlink, fix any errors, and upload the error sheet.
The spreadsheet varies depending on the custom fields created.

The following columns are provided to identify each meter:
- MeterID
- Meter code
- Meter name