Import interval data
Last updated July 6, 2026
Not all meters have an automated data connection—interval data import lets you bring in readings in bulk from meters with no direct integration, fill historical gaps, or load data exported from a third-party system. You can import using a reading import profile or an EnergyCAP spreadsheet template.
Reading import profiles
When you need to upload large sets of readings for meters you can use Reading Import Profiles to simplify the process.
These profiles let you:
- Map columns in your file to the right fields in the system.
- Test the import to make sure everything lines up correctly.
- Reuse the profile whenever you upload readings with the same format.
This saves time and ensures accuracy for recurring imports.
Create a reading import profile
Before you can upload your readings file you need to create a Reading Import Profile. This profile maps the columns in your file to specific data fields in EnergyCAP.
File requirements
Your interval data file must follow these rules:
- Use a flat file format (example, CSV file)
- Use one of the following delimiters: comma, tab, space, semicolon, other (user selected)
- You can specify the decimal separator
- Do not include commas in number values
- ✅ 432100.98
- ❌ 432,100.98
Steps to create a reading import profile
In the Interval Data module, click on Reading Import Profiles.
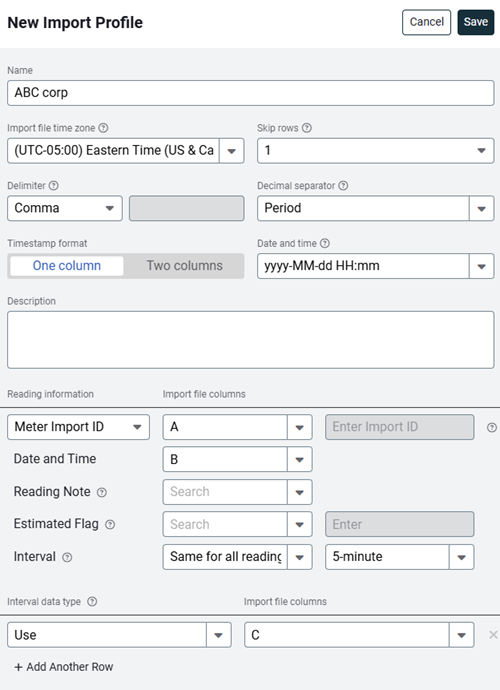
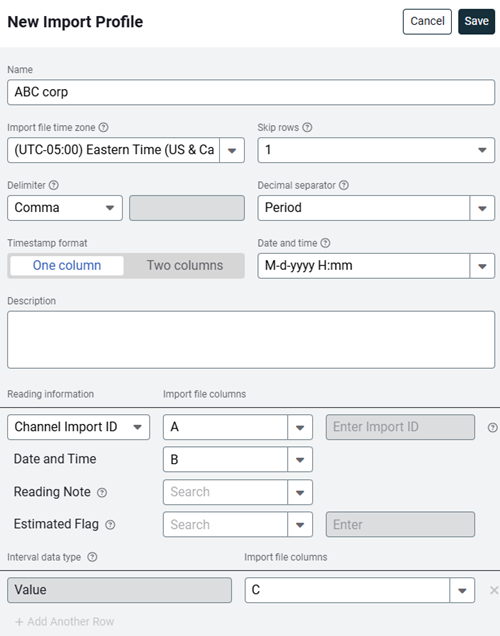
Configure the file information.
- Enter a descriptive name
Name the profile so you can identify it easily when importing files. - Select the profile time zone
Use the meter's timezone or the file's timezone. Data is automatically converted to the meter time zone during the import. - Skip rows
Enter the number of header rows in your file to skip. - Select the file delimiter
Choose whether the file uses comma, tab, or space to separate data.
Important: Do not use commas in numbers. Use432100.98, not432,100.98. - Select the decimal separator
A decimal separator is a symbol that separates the whole number and the decimal parts of a number. The period is common in the US or a comma in continental Europe. You cannot select a comma as both the delimiter and the decimal separator. - Timestamp format
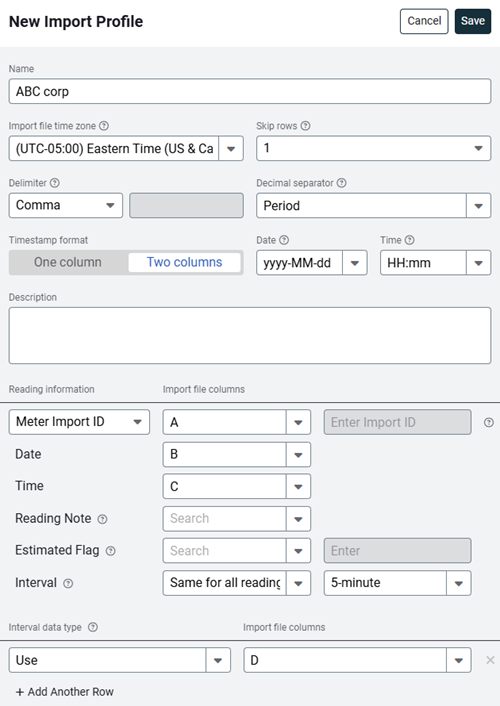
Use the toggle to select the format in your file. - Date and time is required
Time zone can be included in the timestamp for the readings, but this is ignored and the time zone from the profile is used. You can add a new date and time format by typing in the dialog and clicking the + to add it.
H refers to 24 hour time and h refers to 12 hour time. When using 12 hour time remember to include the AM/PM option.
For example 02/28/2024 02:30:15 PM follows this format MM/dd/yyyy hh:mm:ss tt - Description
Add a description for the profile.
Map the file columns - Reading information
- Does the file use Meter Import ID or Channel Import ID
Select the column for this information.
When there is no column in your spreadsheet with import ID to map, select Enter manually in this row and enter the import ID here. - Date and Time
Select the column for the timestamp. This can be one or two columns. - Reading Note
A Reading Note is optional information for each interval reading. Notes from meter readings are displayed on the Interval Data tab and on any bills created from that reading. The limit is 4,000 characters. - Estimated Flag
When using a column to indicate an estimated reading, select the column and enter the flag indicator. If bills are created from estimated readings the bills are tagged as estimated. - Interval
Select Same for all readings when your file contains data from multiple channels (from one or more meters) which all have the same interval. When importing multiple meters with different intervals, the interval column in the file should be populated with the integer value for the number of minutes. (The available options include: 5, 10, 15, 30, 60, 1440, 10080, or 43200)
Interval data type
- Reading type (only needed with Meter Import ID)
Select from use, demand, or other options. - Import file columns
Select the column that has this data.
Steps to import readings with a profile
- Go to the Interval Data module.
- Click Reading Imports, then select Import Readings.
- Use a Profile is selected by default.
- Select the meter reading file you want to upload. You can upload multiple files, that use the same import profile, with a zip file. You can combine CSV and Excel files. Files cannot be larger than 500 MB.
- Select the corresponding profile.
- Click Import to upload the file.
Template
You can use an EnergyCAP template to import meter readings.
Steps to import readings with a template
- Go to the Interval Data module.
- Click Reading Imports, then select Import Readings.
- Use the toggle to select Use a Template.
- Download the template file.
- Enter the meter readings into the file.
- Save the file.
- Select the file to upload with the Browse button.
- Click Import to upload the file.
Additional details
- Imported readings with 24:00 timestamp are imported as 00:00 for the next day. Example: 1/1/2021 24:00 is imported as 1/2/2021 00:00.
- Units will be assigned to the readings in the file after the multiplier and offset are applied.
- When defining the format, choose the time zone of the timestamp in the data file. Times are converted and stored in the time zone of the meter.
Example: The metering system provides an interval file using UTC as the time zone and the meters are configured with the time zone of their location. In this case, the timestamp is converted to the time zone of the meter. - The reading timestamp indicates the end of the interval.
- The file import cannot be reversed. Options to correct an import include:
- Overwrite with a new file. When the date timestamps are the same, old interval data is overwritten with new interval data.
- Delete the readings from each meter manually.
- The Update Readings spreadsheet is useful to update or delete multiple incorrect readings.
- Files can be loaded in any order.
Daylight Saving Time
- In the fall, when clocks move back one hour, the readings for that repeated hour are overwritten.
- In the spring, when clocks move forward one hour, there will be a one-hour gap with no readings.
Timestamp format and examples
Year: yyyy, yyy, yy
Month: MMMM for name ("March"), MMM for partial name, MM for 2 digit ("02"), M for 1 or 2 digit ("1" or "12")
Day: dddd for full name, ddd for partial name ("Sun"), dd for 2 digit ("01"), d for 1 or 2 digit ("1" or "12")
Hour: h for 1 digit, 12 hour time, hh for 2 digit, 12 hour time, H for 1 or 2 digit ("1" or "12"), 24 hour time, HH for 2 digit 24 hour time
Minute: m for 1 or 2 digit time ("1" or "12"), mm for 2 digit time ("02")
Second: s for 1 or 2 digit seconds ("1" or "12"), ss for 2 digit seconds ("02")
AM/PM: t for 1 character ("A" , "P"), tt for 2 character AM/PM
Example formats
Here are some popular date format examples.
| SAMPLE DATE September 5, 2024 2:03:08 PM | |
| Format of data in interval file | Timestamp format to select |
| 2024-9-5 14:03:08 | yyyy-M-d H:mm:ss |
| 20240905 14:03:08 | yyyyMMdd HH:mm:ss |
| 09/05/2024 02:03:08 PM | MM/dd/yyyy hh:mm:ss tt |
|
SAMPLE DATE with timezone September 5, 2024 2:03:08.000 In this example:
|
|
| Format of data in interval file | Timestamp format |
| 2024-09-05T02:03:08.000Z | yyyy-MM-ddTHH:mm:ss.fffZ |
Example for each option
September 5, 2024 2:03:08 PM
| YEAR | |
| yyyy | 2024 |
| yyy | 2024 |
| yy | 24 |
| MONTH | |
| MMMM | September |
| MMM | Sep |
| MM | 09 |
| M | 9 |
| DAY | |
| dddd | Saturday |
| ddd | Sat |
| dd | 05 |
| d |
5 |
| HOUR | |
| h | 2 |
| hh | 02 |
| H | 14 |
| HH | 14 |
| MINUTE | |
| m | 3 |
| mm | 03 |
| SECOND | |
| s | 8 |
| ss | 08 |
| AM/PM | |
| t | P |
| tt | PM |
Manage formats
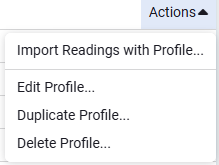
You can edit, delete, or duplicate a profile using the Actions menu for the specific profile.
| Example import files |
|
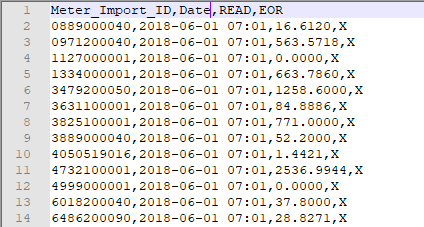
Three column readings with a meter import ID.
|
|
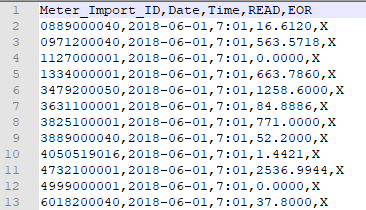
Four column monthly readings with meter import ID.
|
|
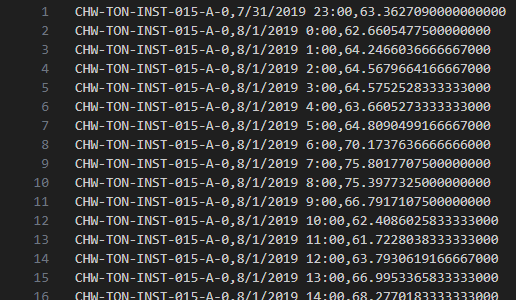
Three column 15-minute readings using channel import ID.
|