How to manage channels and readings
The updated Interval Data module and Interval Data tabs are only available with the Interval Data add on.
Channels
- A channel represents a data stream for a meter.
- Each meter can have multiple channels to track different types of data.
How to create a channel
- Select the meter
Find the meter where you want to add the channel. - Go to the Interval Data tab
Click the Interval Data tab for the meter and click the secondary tab Channels. - Click New Channel
This opens the channel setup form. - Complete the form
• Type (required)
• Select the interval
• Update the name (if needed)
• Set the summarization method, defaults to sum
• Enter the Channel import ID (if used)
• Add an optional description
• If you are creating a calculated channel check the box and then you can enter the formula (see below for more information)
• Select trip or odometer, defaults to trip (trip and odometer offer different optional fields)
• Select the type of units for the channel (required) - Save
Click Save to finish.
How to create a calculated channel
Important channel rules
- A meter must have one non-calculated channel before you can create a calculated channel.
- After a channel has readings, the Channel is calculated option cannot be used.
- Calculated channels cannot be versioned.
- A calculated channel can combine multiple data sources, including:
- Channel readings from the existing meter
- Channel readings from a different meter
- Fixed values (constants)
Steps to create a calculated channel
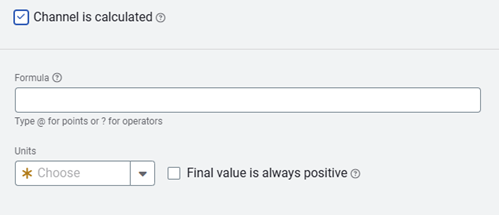
- When creating a new channel, click the checkbox Channel is calculated.
- Notice that the Interval is Automatic.
- Build the formula
- Select one or more existing channels as data sources.
- Add constants
- Apply mathematical operations like add (+), subtract (-), multiply (*), or divide (/).
- Logical operators such as IF, AND, OR are available.
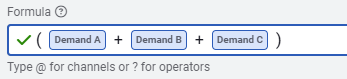
Common formula example
To determine the total demand from individual phase demand you would add each demand channel in the formula.
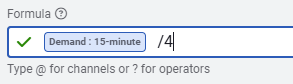
To estimate the use from demand readings. Divide the 15-minute demand value by 4.
- Complete the from.
- Save
Click Save to finish creating the calculated channel.
New channel version
- New Version lets you track changes over time without losing historical data.
- Common use case: meter replacement or multiplier changes.
- Typically you wouldn't delete the channel you would add a new version.
Why create a new channel version?
When something changes on the meter setup, like:
- The multiplier
- The meter itself (a submeter replacement)
This helps maintain data accuracy and consistency over time.
What happens when you create a new versions?
- You set an effective date for the change.
- The system applies the latest version's units to interval data charts.
- Older data is automatically converted to match the latest units.
How to add a new channel version
- Open the meter.
- Go to the Interval Data tab.
- Choose the channel.
- Click the three dots for the channel and select New Version.
- Set the Effective Date and time.
- Enter the new settings. Not all settings can be versioned.
- Save to apply the new version. After you save the version you are prompted to readings.
- Enter readings.
- Final source reading for the old meter (this closes out the old version).
- If the new meter is odometer-style, also enter the initial reading for the new meter.
These readings are visible on the interval data charts and are used by the chargebacks engine to calculate bills.