Scan and upload procedures
Last updated May 21, 2026
This page covers the manual upload method, where you scan bills and upload them as zip files through the Bill Capture Uploads screen.
If your organization uses email delivery, do not use zip files. The email automation extracts individual bill files directly from email attachments and cannot process compressed files.
Scanning Guidelines for Bill Capture
Scanner settings
- Page Size: Auto or 8.5 x 11
- Color Mode: Black White or Auto
- DPI: 300 minimum
- Output: PDF or multi-page TIFF
- Orientation: Auto Text Orientation if available
Scanning instructions
- Scan every page of the bill (include summaries and sub-accounts)
- Each PDF must consist of only one bill
- Name each file uniquely (no extra periods or commas)
- No folders within folders
Bill file organization
- Group by vendor and page count
Scanner setup
- Use a stand-alone scanner
- Feed with top edge forward
- Avoid sideways, upside-down, or skewed pages
Special formats
Postcard-sized bills: one bill per page
PDF limitations
- No password-protected PDFs
- Do not place multiple files into a PDF Portfolio
Marking Bills
- Avoid marking bills
- If needed, use a yellow highlighter only
Upload to Bill Capture
Upload rules
- No mixing of live and historical bills in a single zip
- No nested zips or folders
- Historical zips must contain only one month/year of bills
- Upload historical files in order, starting with the oldest
If account numbers have changed, notify Bill Capture support and provide a cross-reference spreadsheet.
Upload steps
- Zip the bill files.
- In the Bills module, click Upload under Bill Capture.
- Select BC account or organization.
- Click Select Zip Files.
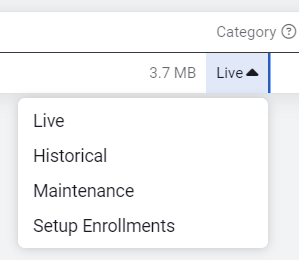
- Select a file category:
- Live – Bills having a statement date within 60 days of the upload date.
- Historical – Bills having a statement date greater than 60 days from the upload date.
The zip file name must start with HIST_ - Maintenance – Use the Maintenance batch category for bills that should be reprocessed or corrected outside the normal live/historical workflow. Requires approval from EnergyCAP support.
The zip file name must start with MAINT_ - Setup Enrollments – For enrollment ZIPs with 10+ new meters
The zip file name must start with SETUP_
Notifications and history
- You’ll get a notification after uploading and another after processing.
- Use the Uploads tab to view upload details and download reports.
File and batch information
Each uploaded ZIP creates a batch. Use this to organize bills by vendor or upload date.
Batch override
In the Bills module menu you can turn on Batch Override to use the ZIP file name as the batch name. Spaces are replaced with underscores.
Example: CLIENTCODE$20190324.13.54.02_X02