Interval Data import
Last updated June 25, 2026
Import multiple meter readings for one or more meters using:
- Interval Data Import (located in the Interval Data module)
How it works
- Interval data is tracked at the meter level on channels.
- A channel represents readings for a specific data type and time interval.
- A meter can have multiple channels—for example, a 15-minute channel and a monthly channel.
How to get your interval data
- Typically you work with your IT department or meter vendor to coordinate the file formats and file locations. What’s most important is to identify the sources of your interval data, determine the available file outputs, and what capabilities are available in those systems to deliver the files on a regular time interval. Common questions to ask IT: What file formats can they give you? Can the formats be customized? Where will the files be located? How often can the systems provide the files?
- The metering system uses a meter import ID or channel ID to identify each of the meters. This ID needs to be entered into EnergyCAP. You can use spreadsheets to enter the meter import ID or channel ID in EnergyCAP.
- At a minimum, your interval data file needs to contain the meter or channel import ID, timestamp, and interval data value. It can contain other information that can be mapped or ignored when you import the file.
- Create an import format to correctly load your file. While different import formats let you import a variety of data with your file, the file does need to follow several formatting rules explained below.
How to import interval data
- Import files manually.
- Use APIs and automation scripts to schedule the import.
- Use service to obtain and upload interval data.
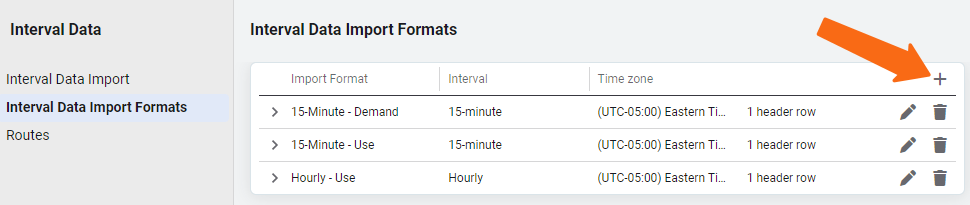
Create an interval data format
Before you can upload your interval data file you need to create an interval data format. This format maps the columns in your file to specific data fields in EnergyCAP.
Your interval file needs to be a flat file delimited by comma, tab, or space.
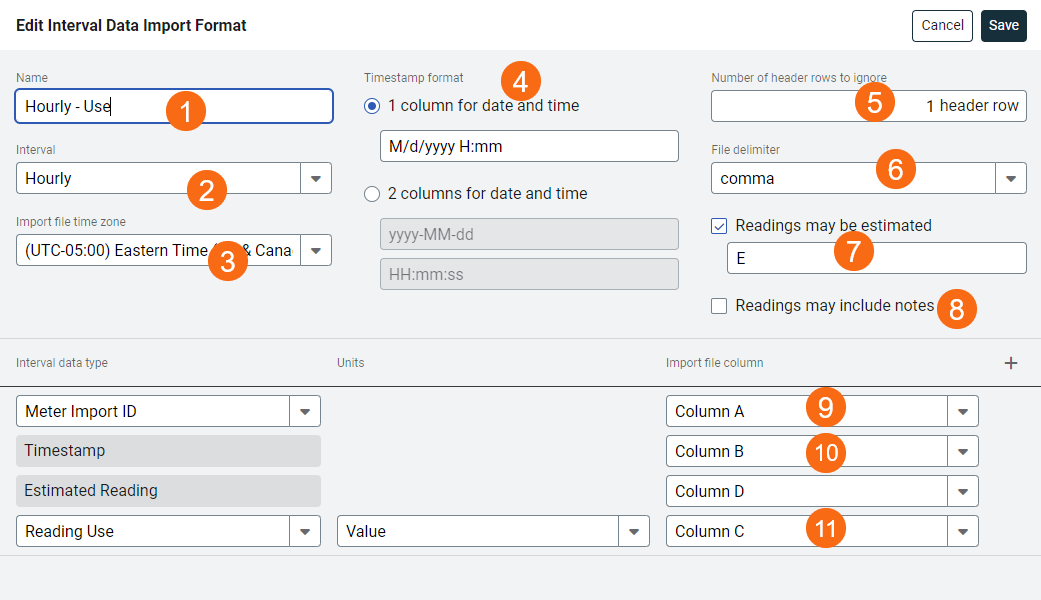
- Enter a descriptive name
This helps you identify and select the correct import format later. - Choose the time interval
Select the interval used in your file (15-minute, hourly) - Select the timezone
Pick the timezone that matches the data in your file (often UTC).
EnergyCAP will automatically convert it to the meter's assigned timezone. - Define the timestamp format
Indicate whether the timestamp is in one column or two, and specify the format.
(This step can be tricky—refer to detailed guidance below.) - Enter the number of header rows
Identify how many top rows should be skipped and not imported. - Choose the delimiter
Example: comma, semicolon, tab.
⚠️ If using commas, numbers must not contain comma separators.
✔️ Valid432100.98
❌ Invalid432,100.98 - Specify estimated reading values
Enter the value used in your file to flag estimated readings, if any. - Indicate if notes are included
Confirm whether your file contains notes in any column. - Select the ID type
Choose either Meter Import ID or Channel Import ID, then pick the corresponding column. - Choose the timestamp column
Select the column that contains the timestamp values. - Choose the interval data column
Select the column that contains the reading values.
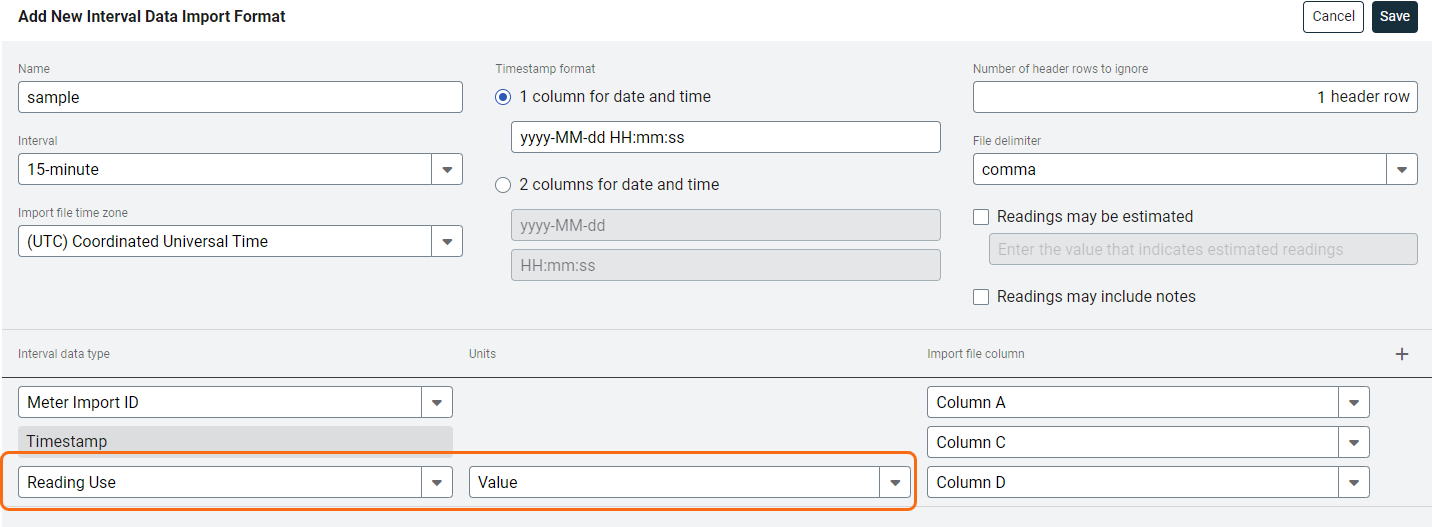
Estimated readings and notes
Estimated readings can be imported when the actual readings are unavailable. After selecting Readings may be estimated, an additional column header is available to map.
If bills are created from estimated readings they are tagged as estimated bills.
Notes from meter readings are displayed on the Interval Data tab and on any bills created from that reading.

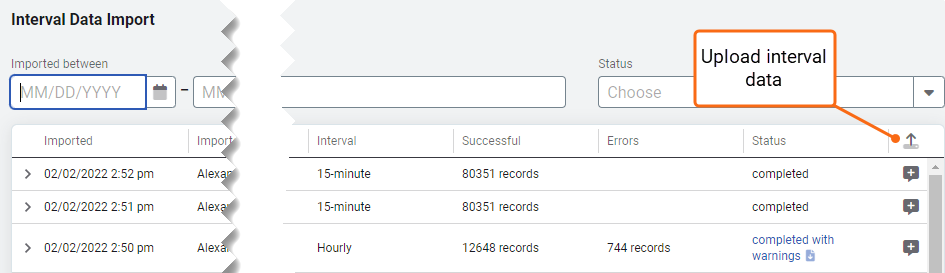
Upload your file
Additional details
- Imported readings with 24:00 timestamp are imported as 00:00 for the next day. Example: 1/1/2021 24:00 is imported as 1/2/2021 00:00.
- If your file contains a variety of commodities, choose Value as your Units.
- When defining the format, choose the time zone of the timestamp in the data file. Times are converted and stored in the time zone of the meter.
Example: The metering system provides an interval file using UTC as the time zone and the meters are configured with the time zone of their location. In this case, the timestamp is converted to the time zone of the meter. - The interval timestamp indicates the end of the interval.
- The file import cannot be reversed. Options to correct an import include:
- Overwrite with a new file. When the date timestamps are the same, old interval data is overwritten with new interval data.
- Delete the readings from each meter manually.
- The Update Readings spreadsheet is useful to update or delete multiple incorrect readings.
- Files can be loaded in any order.
Timestamp format and examples
Year: yyyy, yyy, yy
Month: MMMM for name ("March"), MMM for partial name, MM for 2 digit ("02"), M for 1 or 2 digit ("1" or "12")
Day: dddd for full name, ddd for partial name ("Sun"), dd for 2 digit ("01"), d for 1 or 2 digit ("1" or "12")
Hour: h for 1 digit, 12 hour time, hh for 2 digit, 12 hour time, H for 1 or 2 digit ("1" or "12"), 24 hour time, HH for 2 digit 24 hour time
Minute: m for 1 or 2 digit time ("1" or "12"), mm for 2 digit time ("02")
Second: s for 1 or 2 digit seconds ("1" or "12"), ss for 2 digit seconds ("02")
AM/PM: t for 1 character ("A" , "P"), tt for 2 character AM/PM
Example formats
Here are some popular date format examples.
| SAMPLE DATE September 5, 2024 2:03:08 PM | |
| Format of data in interval file | Timestamp format to select |
| 2024-9-5 14:03:08 | yyyy-M-d H:mm:ss |
| 20240905 14:03:08 | yyyyMMdd HH:mm:ss |
| 09/05/2024 02:03:08 PM | MM/dd/yyyy hh:mm:ss tt |
Example for each option
September 5, 2024 2:03:08 PM
| YEAR | |
| yyyy | 2024 |
| yyy | 2024 |
| yy | 24 |
| MONTH | |
| MMMM | September |
| MMM | Sept |
| MM | 09 |
| M | 9 |
| DAY | |
| dddd | Saturday |
| ddd | Sat |
| dd | 05 |
| d |
5 |
| HOUR | |
| h | 2 |
| hh | 02 |
| H | 14 |
| HH | 14 |
| MINUTE | |
| m | 3 |
| mm | 03 |
| SECOND | |
| s | 8 |
| ss | 08 |
| AM/PM | |
| t | P |
| tt | PM |
Edit or delete a format
If your file format changes you can edit your interval data import format. When you no longer need the interval data import format, delete it.

| Examples import files |
|
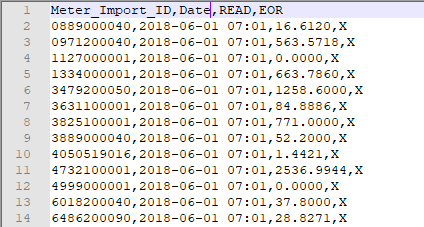
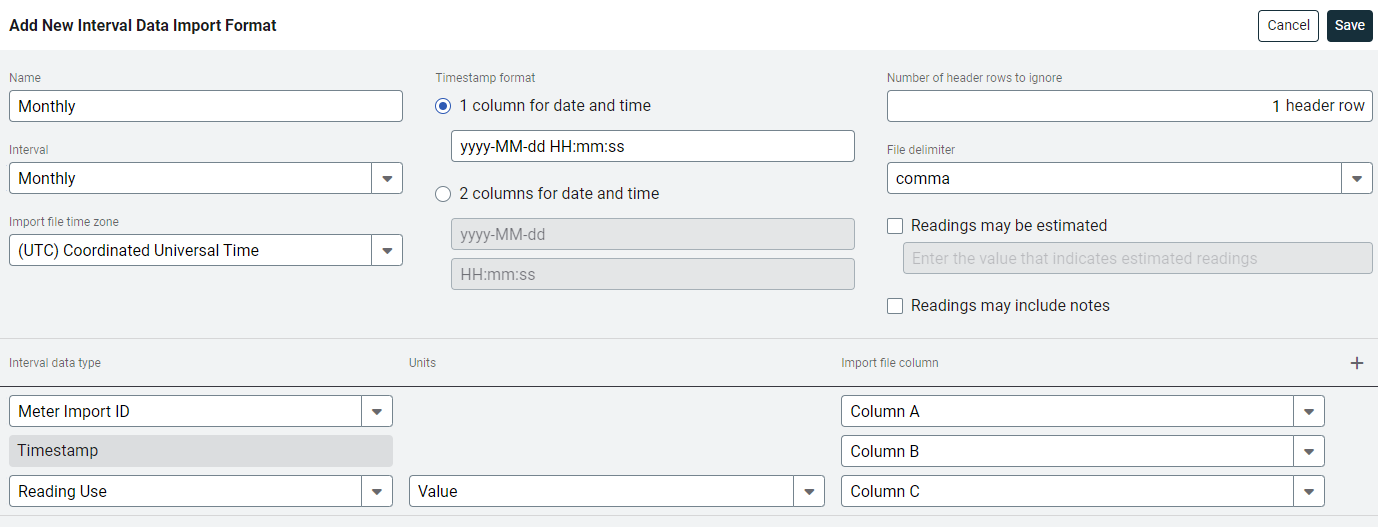
Three column monthly readings.
|
|
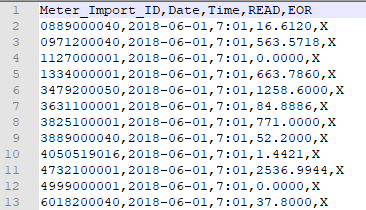
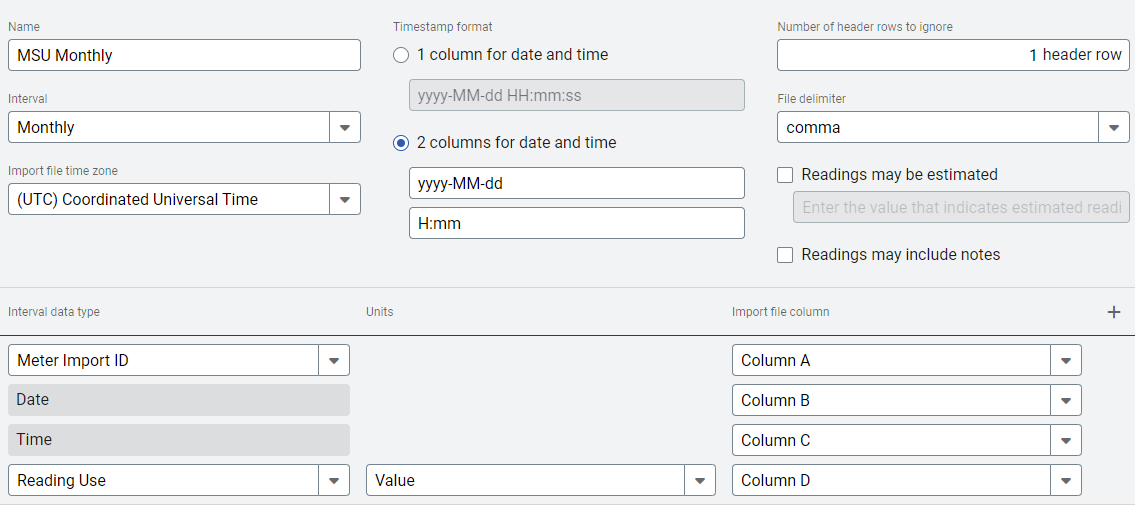
Four column monthly readings.
|
Import counter data
A counter, similar to a meter, tracks items for a place. The ability to manage counters is available in the installed client.
Examples
- Number of boxes shipped per day for a warehouse
- Number of visitors per day to a museum.
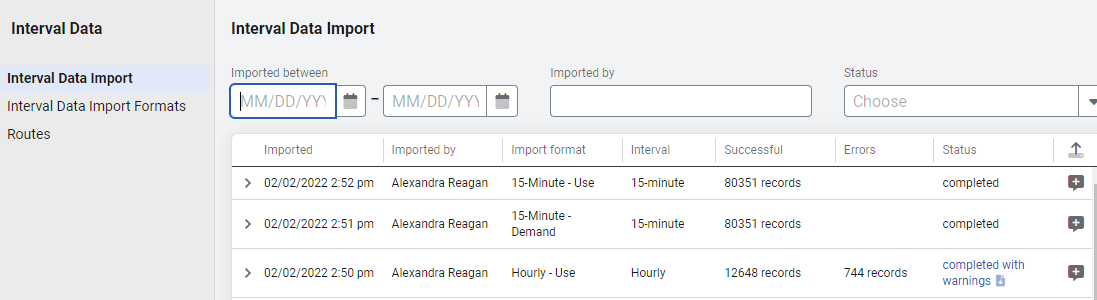
Interval data import
Interval Data Import lets you
- Add a comment to the import
- Download an error spreadsheet
- Filter the list by date, user, or status
- Perform imports
The ability to import interval data can be controlled with permissions.
Permissions
A roles and permissions audit report is available for download on the Users and Roles page. The report lists each role and the permissions assigned to it. It does not include per-user login timestamps or user activity data.
Custom user roles are created by administrators.