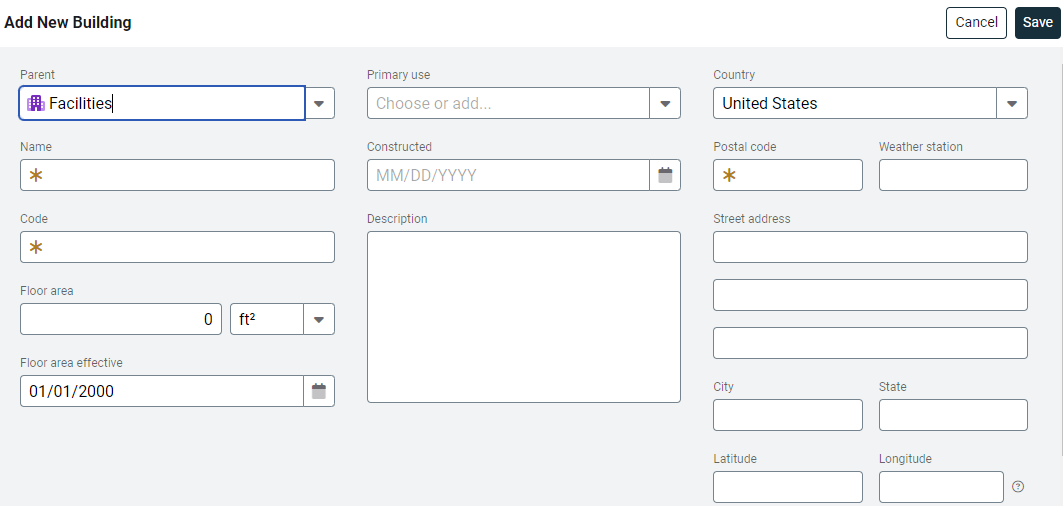
Add a site with the Create button
The Create button provides quick access to manual bill entry, importing files, and creating common UtilityManagement objects.

Steps to add a new site
- Where will the new site be placed in the facilities tree? Does the parent organization already exist or do you need to create a new one?
- To create a new building click on the Create button and Add Site.

- Fill in the Add New Site form. The Parent is the organization you selected or created in step 1.

- Save your site.
- The next step is to assign this site as the parent to an existing meter (edit the meter and select this site as the parent) or create a new meter and possibly a new account.
If you are creating a new meter it helps to have a copy of the bill so you have the account number, vendor name, and rate schedule information.
Site details
Parent: Determines where the site is created, choose root or another organization. You can nest organizations as needed.
Name: The name of the site, this can include spaces and is limited to 50 characters.
Code: A unique identifier for the site, cannot include spaces and is limited to 32 characters.
Type: The type can be used as a filter in charts and reporting and helps you visually categorize sites in your hierarchy.
Primary Use: From the drop-down choose a Primary Use for the site or add a new primary use. The primary use groups sites in the Groups and Benchmarks module allowing you to compare similar sites.
Area: Enter the current area. Area history is maintained with the Actions menu.
Area effective: Set the effective date for the floor area.
Constructed: The oldest date available to enter is 1/1/1900, if your site is older than 1/1/1900, enter the date of the last major retrofit. This date lets you compare sites with similar construction dates when discussing energy efficiency.
Description: Add information about this site.
LOCATION
Country: The Default country in System Settings populates this field. This field can be updated.
Postal Code: Postal code determines the weather station. Weather information is used for calendarization, normalization, and Cost Avoidance.
The postal code automatically populates three fields (if they are empty, for United States and Canada).
- Weather Station
- City
- State
Weather Station: For United States and Canada the weather station is based on the postal code, for all other countries weather data is based on the latitude and longitude. United States and Canada can enter custom weather stations.
Report-03 lists the weather station abbreviation and location.
Street address: Enter the street address to use for this site.
City and State: The system automatically populates this field based on the postal code for the United States and Canada, but only when the field is blank.
Latitude and Longitude: For countries other than United States and Canada this is used for weather data.
The help icon has more information on finding your site's latitude and longitude.
If latitude and longitude are entered, they are used by maps to accurately place sites. If you leave these fields empty, UtilityManagement may populate them based on the site address, and you can update them at any time.
Allowed characters for codes
|